
🥢 7 Best Tips for Restaurant-Style Chilli Paneer!
If you have ever eaten Chilli Paneer or are a fan of it, then this blog is for you! Because whenever you feel like eating something spicy, tangy and restaurant-style, the first name that comes to mind is Chilli Paneer. But getting the same taste, texture and zing while making it at home is difficult, isn’t it?
Stop worrying! Today we will tell you and you will get to know 7 Best Tips through which you too can make restaurant-style Chilli Paneer at home – that too easily. So go ahead, get a spoon and spoon ready, and let’s add some spice to the taste!
🥢 7 Best Tips :
🔥 Tip 1: Fry Paneer the right way
First of all, let’s talk about the ingredient – Paneer! Chilli Paneer cannot be truly enjoyed unless the paneer is crispy and golden brown. To fry paneer, mix some cornflour, flour and salt and coat it. After that, shallow or deep fry till it turns golden.
👉 Pro Tip: After frying paneer, put it in hot water for 2-3 minutes, then take it out and use. By doing this, it will remain soft from inside and crispy from outside.
🌶️ Tip 2: Balance of spices is a must
The spice game in Chilli Paneer should be strong, but not over-spicy. Green chilli, black pepper, red chilli sauce, and a little vinegar give a perfect Indo-Chinese fusion taste.
👉 Pro Tip: Use Kashmiri red chilli for colour – you will get a bright red look without compromising on the taste!
🧅 Tip 3: Magic of Crunchy Veggies
Chilli Paneer is delicious without capsicum and onion. Do not overcook them – stir lightly and fry to keep them crisp. This crunchiness gives the dish that street-style feel.
👉 You can also make the dish visually attractive by using colourful bell peppers (red, yellow, green).
🧄 Tip 4: Strong Tadka of Garlic-Ginger
The strong flavour of garlic and ginger is a must for making restaurant-style Chilli Paneer. Sauté finely chopped or grated garlic-ginger well in oil until it turns golden brown.
👉 Pro Tip: Use garlic oil or sesame oil for authentic Chinese touch!
🍛 Tip 5: Sauce Combo Should Be Perfect
The combination of sauces makes Chilli Paneer flavorful. These sauces are a must:
1. Soy Sauce (for saltiness)
2. Red Chilli Sauce (for heat)
3. Green Chilli Sauce (for sharpness)
4. Tomato Ketchup (for slight sweetness)
5. Vinegar (for tanginess)
Keep a perfect balance of these – not too sweet, not too sour. Keep testing the taste while mixing!
🍽️ Tip 6: Dry or Gravy – Decide First
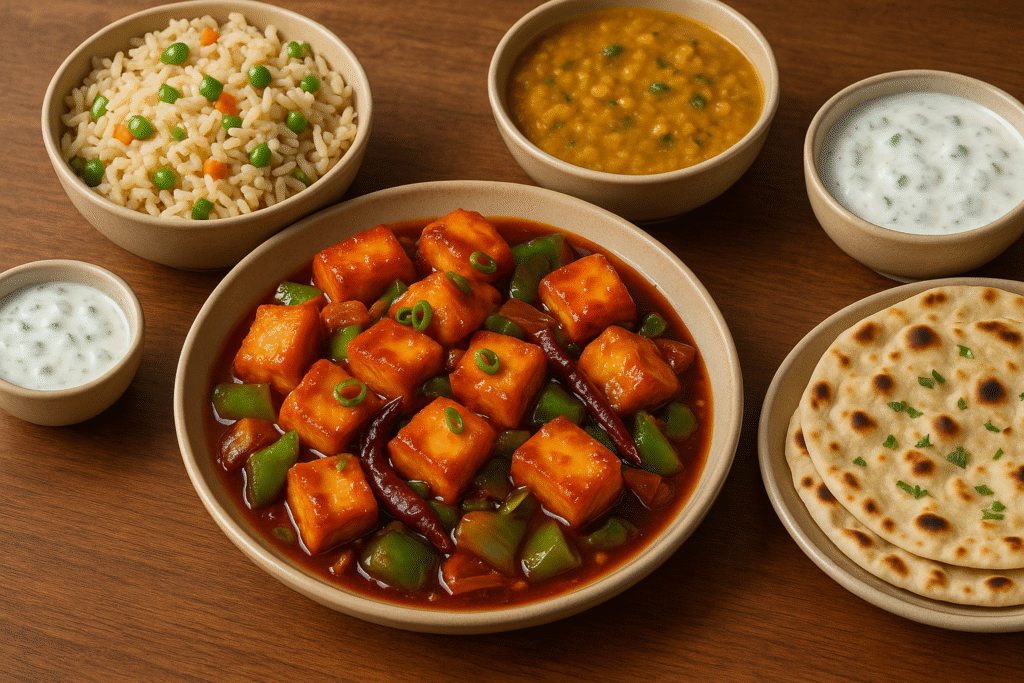
Many people are confused whether to make Chilli Paneer dry or in gravy? So decide first. If you are making it for starters then dry Chilli Paneer is perfect, but if you want to serve it with the main course, then semi-gravy version will be best.
👉 If you want to make gravy then use cornflour-water slurry for thickness. Add some soya sauce and chilli sauce and boil it.
🍚 Tip 7: Presentation is also a part of Taste
Garnishing and presentation also matter, especially when you are making restaurant-style at home. Garnish with finely chopped spring onions. If you want to be more fancy, you can also add sesame seeds or roasted garlic chips.
👉 Serve on a black plate or on a sizzling hot plate – and see everyone’s reaction!
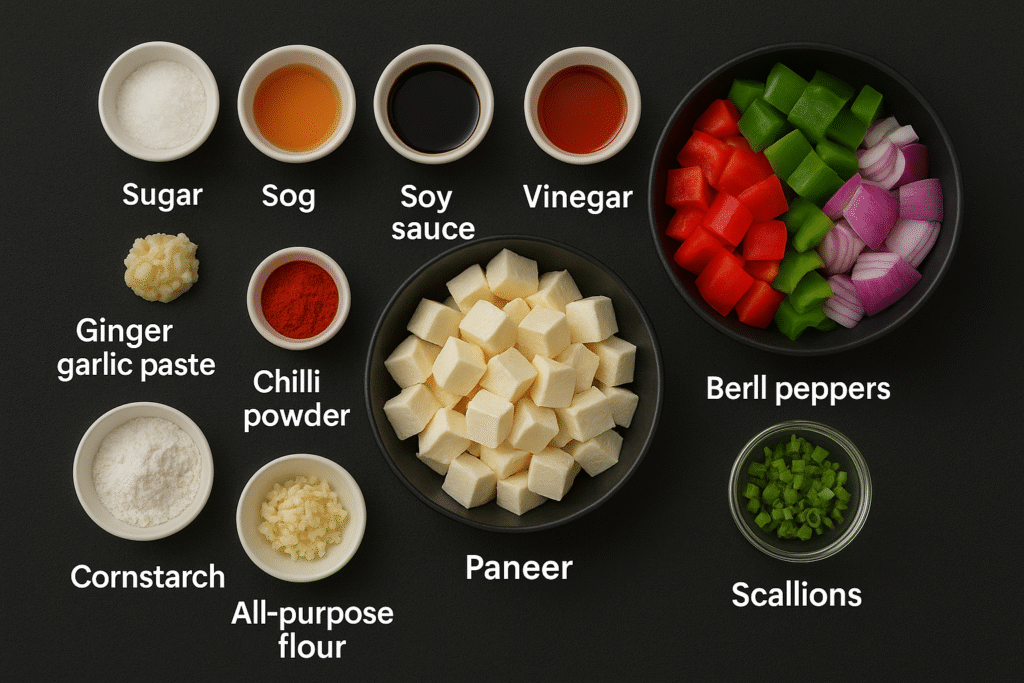
🧾 Chilli Paneer Ingredients (For 2-3 Servings):
🔹For Marinating & Frying Paneer:
A. 250 gm Paneer (cut into cubes)
B. 2 tbsp Cornflour
C. 1 tbsp Maida (All-purpose flour)
D. 1/2 tsp Black Pepper
E. Salt – as per taste
F. Water – a little (to make paste)
G. Oil – for frying
🔹For Gravy/Sauce:
1 tbsp Oil (preferably sesame or normal)
1 tbsp Garlic (finely chopped)
1 tsp Ginger (finely chopped)
2 Green Chillies (slit or chopped)
1 medium Onion (cubed petals)
1 Capsicum (cubed – green, red, or yellow)
1 tbsp Soy Sauce
1 tbsp Red Chilli Sauce
1 tbsp Green Chilli Sauce
1 tbsp Tomato Ketchup
1 tsp Vinegar
1/2 tsp Black Pepper
Salt – as per taste
1 tsp Cornflour + 2 tbsp Water (slurry for gravy)
Spring Onion (for garnish)
👨🍳 Chilli Paneer Recipe – Step by Step:
🔸 Step 1: Marinate the Paneer
Add cornflour, flour, salt and black pepper in a bowl.
Add some water and make a smooth coating batter.
Dip the Paneer cubes nicely in this batter.
🔸 Step 2: Fry the Paneer
Heat the oil in a pan or frying pan.
Shallow or deep fry the marinated paneer cubes till golden brown.
Take out on a tissue paper so that the extra oil drains out.
🔸 Step 3: Prepare the Gravy/Sauce
In the same pan, put some oil, sauté garlic, ginger and green chilli.
Add onion and capsicum and stir fry on high flame for 2-3 minutes (it should be crunchy).
Now add all the sauces – soy, red chilli, green chilli, ketchup, vinegar.
Add salt and black pepper – mix everything well.
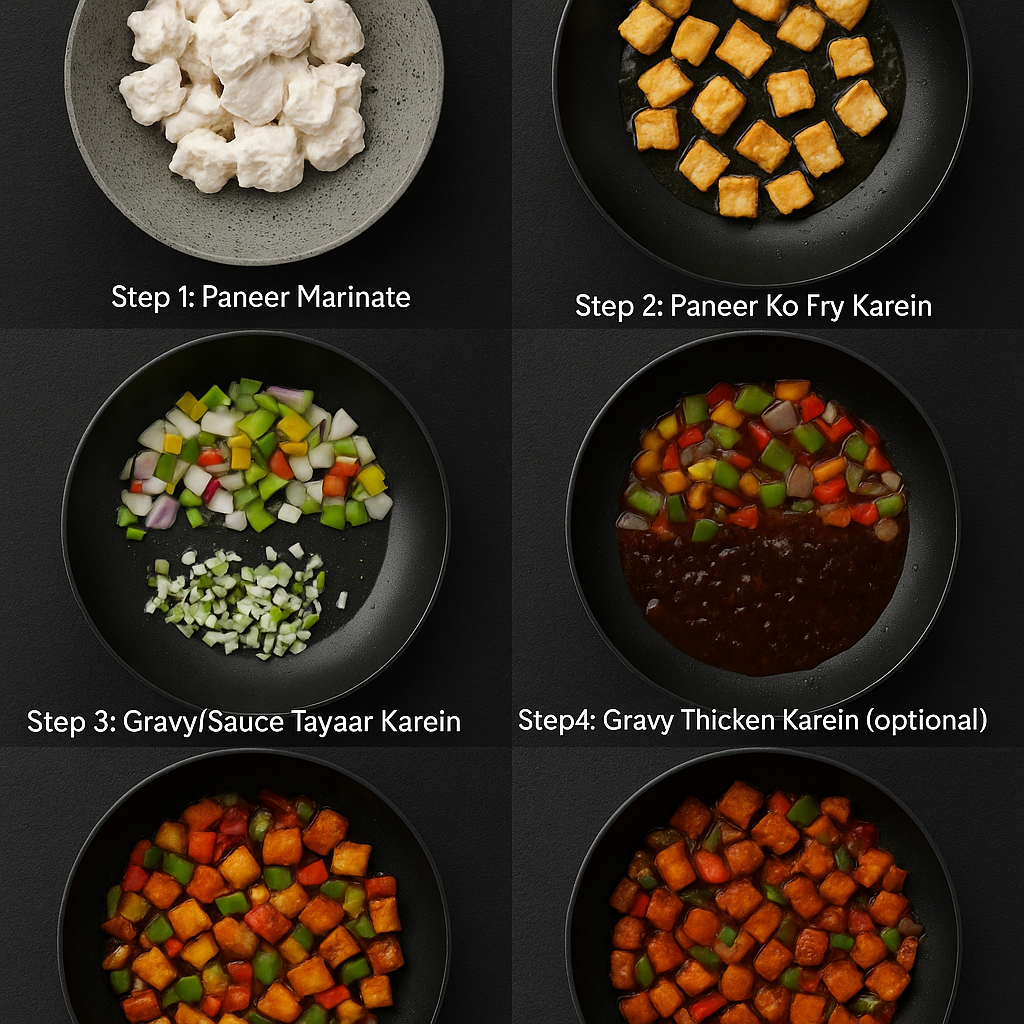
🔸 Step 4: Thicken the Gravy (optional)
If you want to make gravy version, then add cornflour slurry (cornflour + water) and bring to a boil.
Cook for some time till the sauce thickens.
🔸 Step 5: Mix the Paneer
Add the fried paneer cubes to the sauce and toss gently.
Cook for another minute on high flame so that everything gets nicely coated.
🔸 Step 6: Garnish and Serve
Garnish with spring onions.
Serve hot – whether as a starter or with noodles/fried rice!
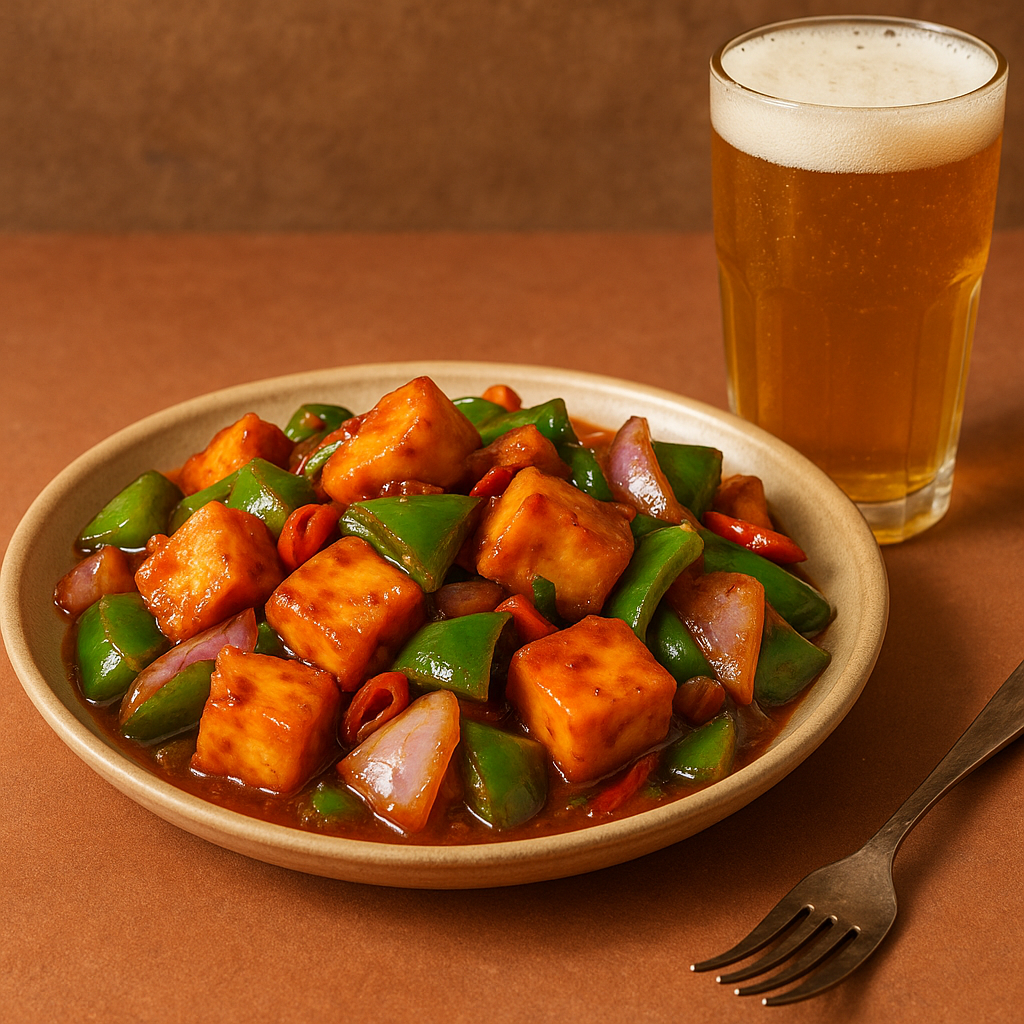
📌 Final Words: “Whether you enjoy it dry as a spicy starter or with gravy alongside fried rice or noodles, Chilli Paneer never fails to add a fiery twist to your meal—an irresistible Indo-Chinese favorite worth every bite!” Bonus Tip for Chilli Paneer Lovers!
If you feel that homemade Chilli Paneer does not taste the same – then definitely follow these 7 tips. Taste, texture and look – everything will have the exact restaurant-style feel. And the best thing – health will not be compromised due to being homemade!
So what will you make for dinner tonight?
Chilli Paneer, of course! 😋
💬 Chilli Paneer FAQs Q1: Is Chilli Paneer veg?
Yes, traditional Chilli Paneer is a pure vegetarian Indo-Chinese dish made of paneer and veggies.
Q2: What is the difference between Dry and Gravy Chilli Paneer?
The dry version uses less sauce and is served as a starter. The gravy version is a little saucy and is served with fried rice or noodles.
Q3: Can Chilli Paneer be made in an air fryer?
Absolutely! Paneer can be crisped in an air fryer at 180°C for 8-10 minutes. It is perfect for a healthy and oil-free option.